
Best Choice Products 4x2x2ft Outdoor Metal Raised Garden Bed, Deep Root Planter Box for Vegetables, Flowers, Herbs w/ 119 Gallon Capacity – Gray
$89.99
Related Products


Product description


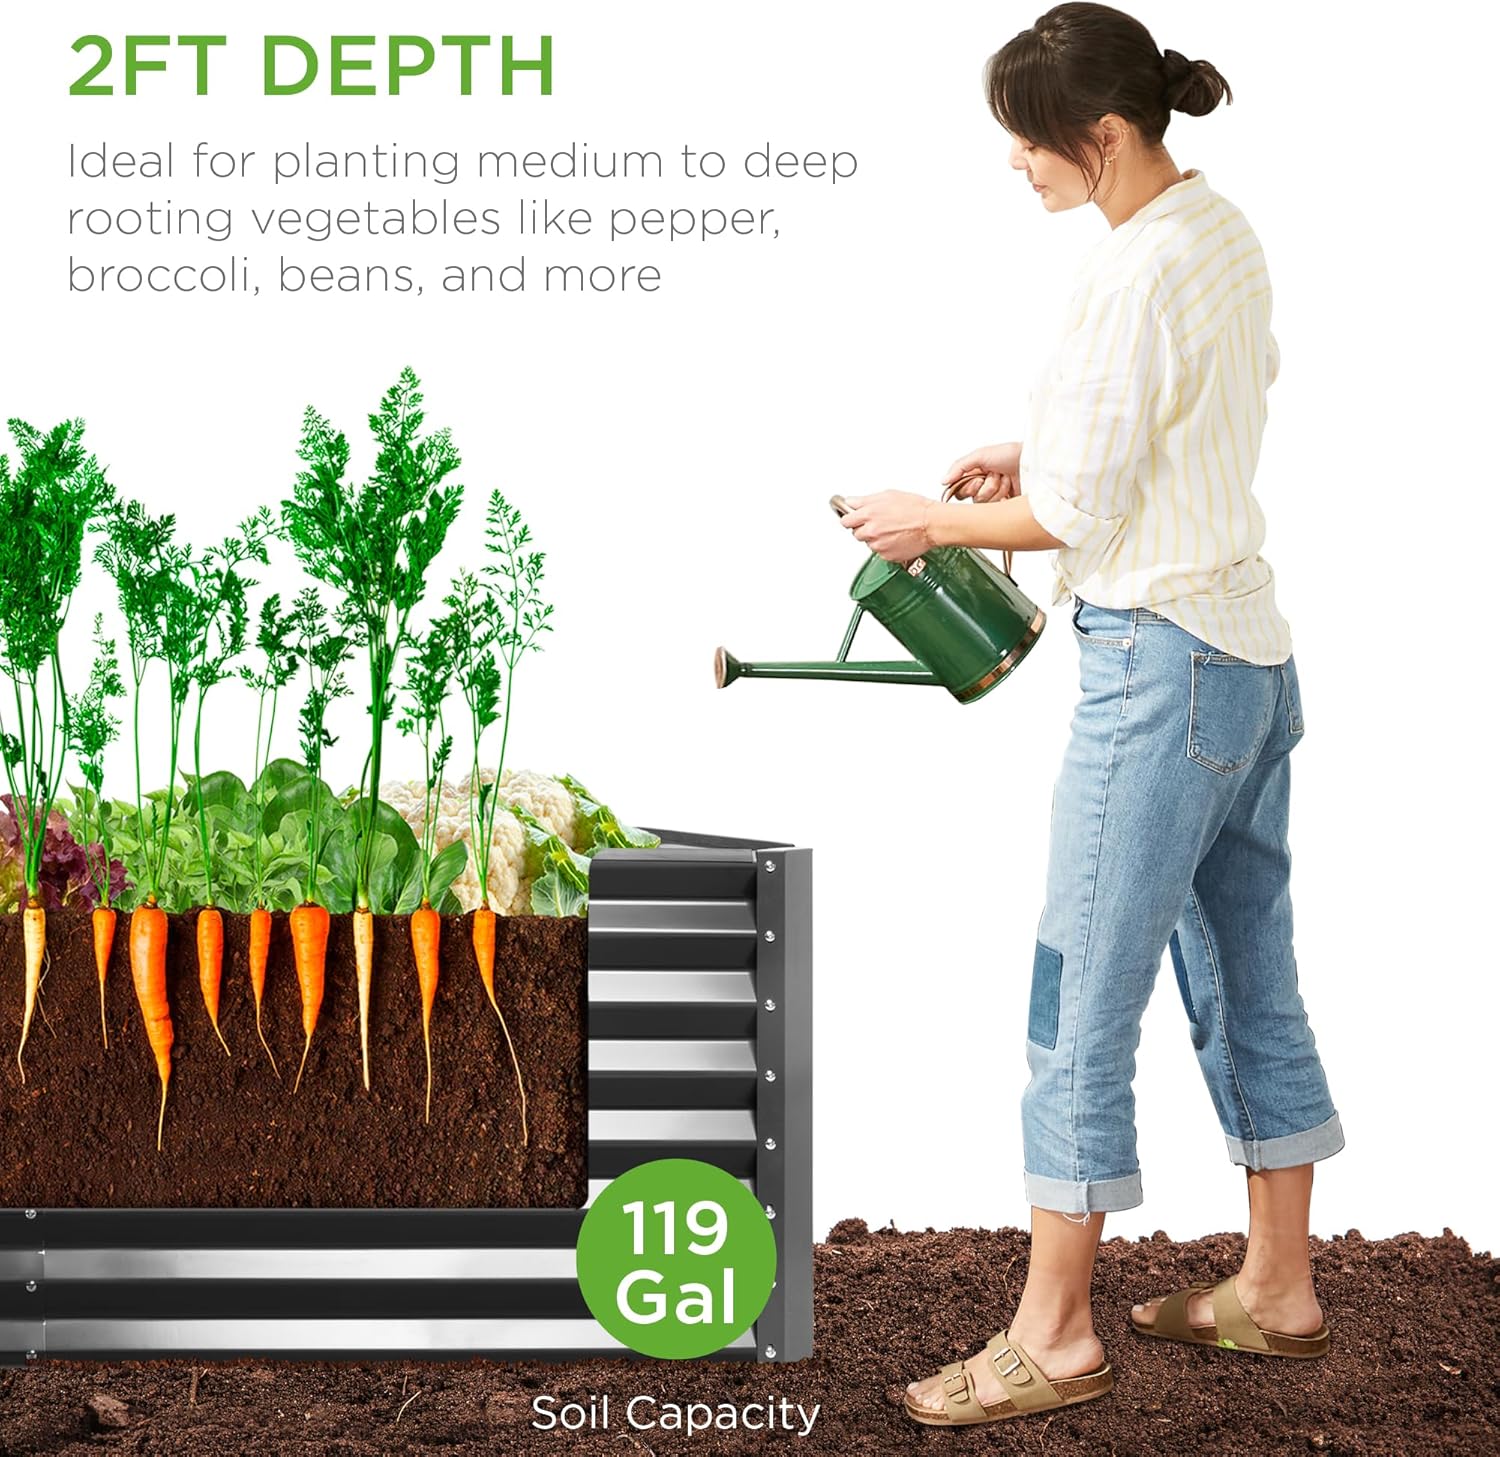
2FT GROWING DEPTH: 24 inches of depth holds up to 119 gallons of soil-ideal for medium to deep rooting plants and vegetables like broccoli, beans, and more. Note: This product does not include a bottom panel
OPEN BASE DRAINAGE: An open bottom promotes drainage to help prevent water and salt buildup while allowing your plants roots easy access to nutrients
TOOL-FREE ASSEMBLY: Beveled steel panels come together with a set of included wingnuts and bolts with rubber edging for your added protection
BUILT TO LAST: Made of powder-coated steel panels and complete with four ground stakes to secure your garden bed and keep it looking its best
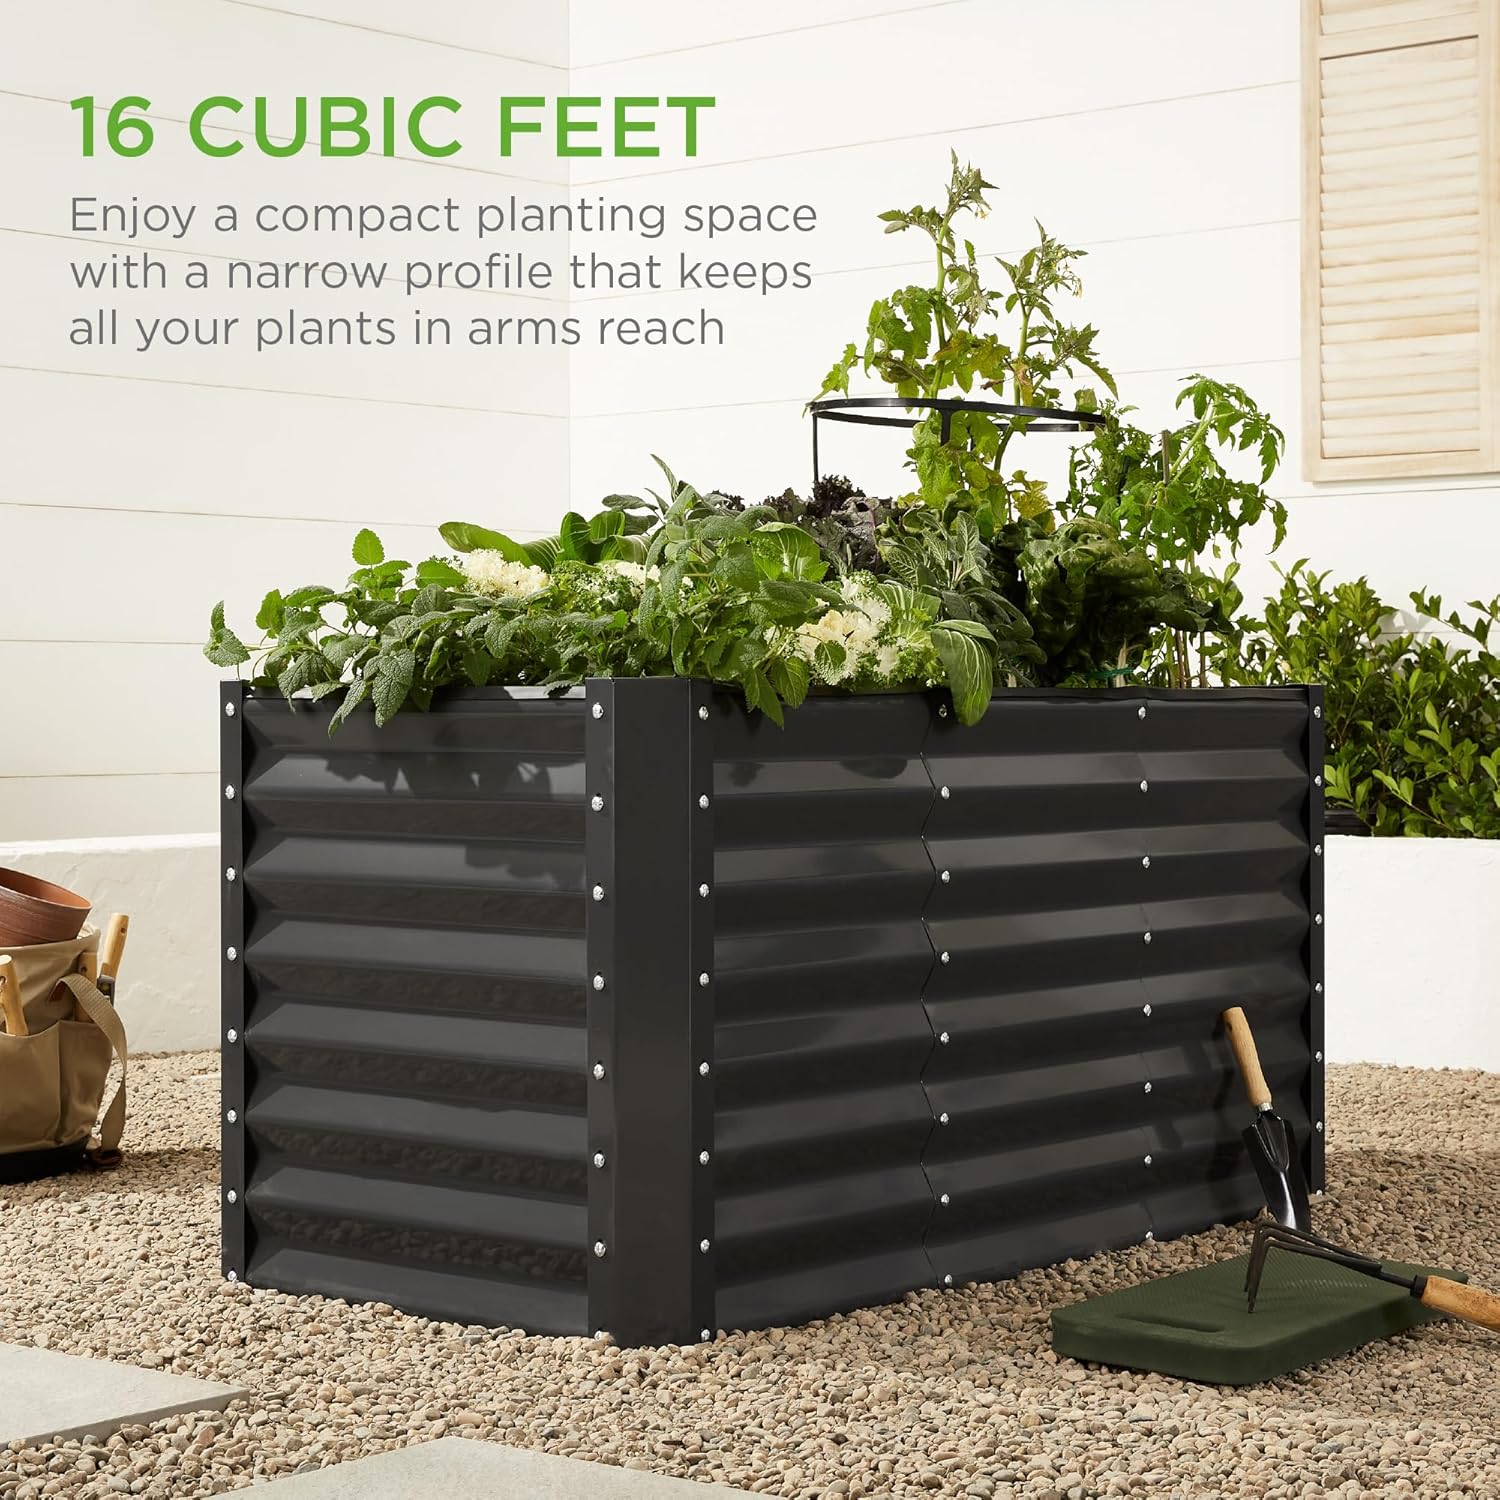
16 CUBIC FEET: The compact planting space makes this the ideal place to set up a self-contained micro-environment for unique and non-native plants; OVERALL DIMENSIONS: 48″(L) x 24″(W) x 24″(H)
8 reviews for Best Choice Products 4x2x2ft Outdoor Metal Raised Garden Bed, Deep Root Planter Box for Vegetables, Flowers, Herbs w/ 119 Gallon Capacity – Gray
Add a review

$89.99
Amazon Customer –
Everything I wanted and more. Not the most expensive, but better than the cheapest.
I got the 6x3x2. I plan on ordering a second one right away. Plus we’re gonna do two of the 8ft now on the other side. How much soil do you need? ALOT. Somewhere around 15x 40lb bags. So be prepared for that. This is not going to fill up easily. We’re talking two feet deep and it’s big. You can fill it with logs and shredded paper at the bottom layer if you don’t have straw.Pros:Cheap but not too cheap(and yes, there is cheaper)Metal so it will never rotSturdy once you’ve got every screw in placeThe increased depth makes it possible to grow anything in itHolds a HUGE amount of crops by square foot gardening methodsLooks beautiful. Can’t complain when it looks this good for sheet metal.Wing nuts makes this job easy, no socket required to hold the nuts.Rubber ribbing that fits the top comes with it if you want it installed, it’s not on in my pictures. If you need to replace it, it’s the same stuff used as ,”car door protector u shape rubber seal.”Cons:Cheaper than the big brands that come with crazy angle brackets and crossmembers and riser blocks so there’s not a tremendous amount of quality from this.The stakes that come with it are garbage. Get some round head plastic stakes and drive them into the peg holes on the corners or this thing is going to fly away out in a field if it’s not densely filled.Layer your soil like pictured.1)Throw down cardboard, not plastic underneath this thing. Lots and lots of cardboard. Plastic will break down and turn into muck, you don’t want that. Just use degradeable cardboards. If you ever have to remove this bed, you can just drag it all out. No picking up plastic pieces.2)Take round 2 inch logs or branches and layer them everywhere so this thing drains. Do not put soil on the bottom of this raised bed!!! The bed will shift and raise up above the soil line and look stupid with time.3)Add sticks, lots of sticks of all shapes and sizes or straw. If you don’t have straw, use shredded paper mulch like I do. This creates an air layer that will break down with time but allows air and water travel at the start of an ecosystem.4)Add composted manure(it is way cheaper than bagged soil and has a nice sand mix to it, to fill this thing with topsoil would be quite alot of money)5)Add your own compost(the clumpier the better)6)Add garden soil7)Top with topsoil and vermiculite, pack it gently with a 2×4. Don’t fill your bed with ,”potting,” soil or the sides will collapse in wind or your plants will fall out from soft root systems, just the top layer should be topsoil. Spread mulch over this as your plants come up.(optional, some people like to see the topsoil)Tip, never empty this bed. You’ll destroy whatever ecosystem you’ve built. If your soil looks dead then remove final crop of plants, remove one to two inches of soil and throw it into your compost. Replace that same depth with fresh soil. If you’re using this as a raised bed for ferns and flowers, use your flower mix in place of garden soil. If you don’t want to remove any soil in the future, use a powdered water soluble fertilizer and you’re done.Raised beds are alot easier than digging ever was.
Chica-Dee-Dee –
Nice garden boxes!
1 year update — these garden boxes have worked out very well. I have them on a slight slope and dug a bit in to the slope on the back side of each box to ensure each box is level. I currently have 7 of the 6’x3’x2’ boxes. I assembled them myself and moved them to the garden on my own. Not terribly difficult but an extra set of hands would have been helpful.The boxes feel a little flimsy upon being built but once they were places & filled, they were fine. I am careful not to lean on the edges of the boxes as they would surely bend. Also, the support bars are very lightweight and bend very easily, if you’re not careful.As a side note, I did not use the rubber edging/trim that comes w/each box. I can’t imagine it would stay in place & I saw no benefit.I placed my boxes in 2 rows, the rows and boxes are all 3’ apart & the spacing worked out very well. It was easy to maneuver around each of the boxes. I added a hog panel arched ‘trellis’ between the 2 rows of beds. I did not need to use t-posts to secure the hog panel as it is wedged between 2 of the garden boxes (end-to-end).As the boxes are a pretty good size, it took quite a lot to fill them & I followed the ‘lasagna’ method for filling w/cardboard on the bottom, then branches & twigs and leaves & lawn clippings. Then a layer of compost, more grass clippings and finally a mix of garden & top soil. Once planted, I kept the beds mulched all season long w/fresh layers of grass clippings.The boxes are open to the ground on the bottom & I had no issues with drainage. Also, the use of grass clippings as mulch helped minimize the amount of hand watering I needed to do (we did not use any chemicals on our lawn!). Initially, I used hay as mulch for a couple of my boxes & spent the entire season picking weeds from those beds (lesson learned)! The grass mulch definitely helped but I feel like I still watered a fair bit (south facing, full South Carolina sun).I made hoops from bamboo that I split & used 3 hoops per bed & covered them with netting held down w/garden staples to keep birds & other critters at bay. This worked great, even kept the deer out.I added a small compost container with a screw top lid (I cut off the bottom of the container & buried each container so the lid was at the top of the soil). Throughout the season, I added kitchen scraps… egg shells, fruit/veggie peels/skins, etc. to the containers but I think I’ll skip this step this coming season. I’ll continue to compost but will do so in my central compost setup and will amend the soil in the boxes w/compost, as needed.By the end of the growing season, I had experienced multiple inches of settling in each box, as a result of the breakdown of the components of my initial fill method. I expect I’ll add a few inches of a mix of compost, grass clippings/leaves and garden/top soil before planting my boxes this spring.I really do like these garden boxes a lot. They are functional & I am very happy with how they look & how they’re holding up. In fact, I plan to purchase one more box this spring, for a total of 8.
United Paper Online –
Protective plastic is a nightmare to remove
Overall, the bed looks nice. It came with a few scratches on the inside, but that was not an issue. My huge complaint is the protective plastic they applied. I purchased the 6×3 bed, and it took me over 3 hours to remove the protective plastic. I tried every way to remove it, horizontal, vertical, but neither worked any better than the other. The plastic was applied in sections, so if you were ever lucky enough to “get a run” on a piece, it would only go so far. Removal also left behind adhesive residue. I have another brand of raised bed and the plastic was all in one sheet and did not leave behind any residue. Unfortunately, that experience will factor into purchasing another Best Choice bed.Once you get past the frustration of the plastic removal, the bed itself is decent quality and is relatively easy to put together. More detailed instructions would be nice, but since I had another raised bed I knew what to do. My biggest concern is the material of the hardware (bolts and wingnuts.) It will be interesting how long they last.Would I purchase this bed again? Maybe, especially if the manufacturer addresses the protective plastic issue.
Amazon Customer –
We have put them in our garden for berry bushes. Love this colour, blends great in the yard.Not thick material but works great!
Liam Gainey –
These are perfect for deep root vegetables for anyone who can’t make their own planter box from wood or doesn’t want to deal with them rotting.
Diane J Cave –
I previously had wooden boxes along the side of my house that were rotting. Decided to purchase these to replace the wooden ones. They weren’t the exact dimensions, but were super easy to modify. Just marked them with a grease pencil, cut them with a grinding wheel and drilled some new holes. I’m super happy with how they look. The down fall to them is that I think the cross supports are a little weak. Either they should be stronger or a piece of angle should run down the front and back bolt seams and then have the cross braces. I would definitely recommend them.
Alex A. –
I didn’t get it on time and customer service was great- I got it next day after their intervention.But the product is not good- not sturdy, very easy bending, cheap made.For the same price I got other garden beds- stainless steel, tough ones , really good quality.I will keep this one s I did assemble it but I will not recommend this product.
Nick Paulozza –
Like the height of the garden.